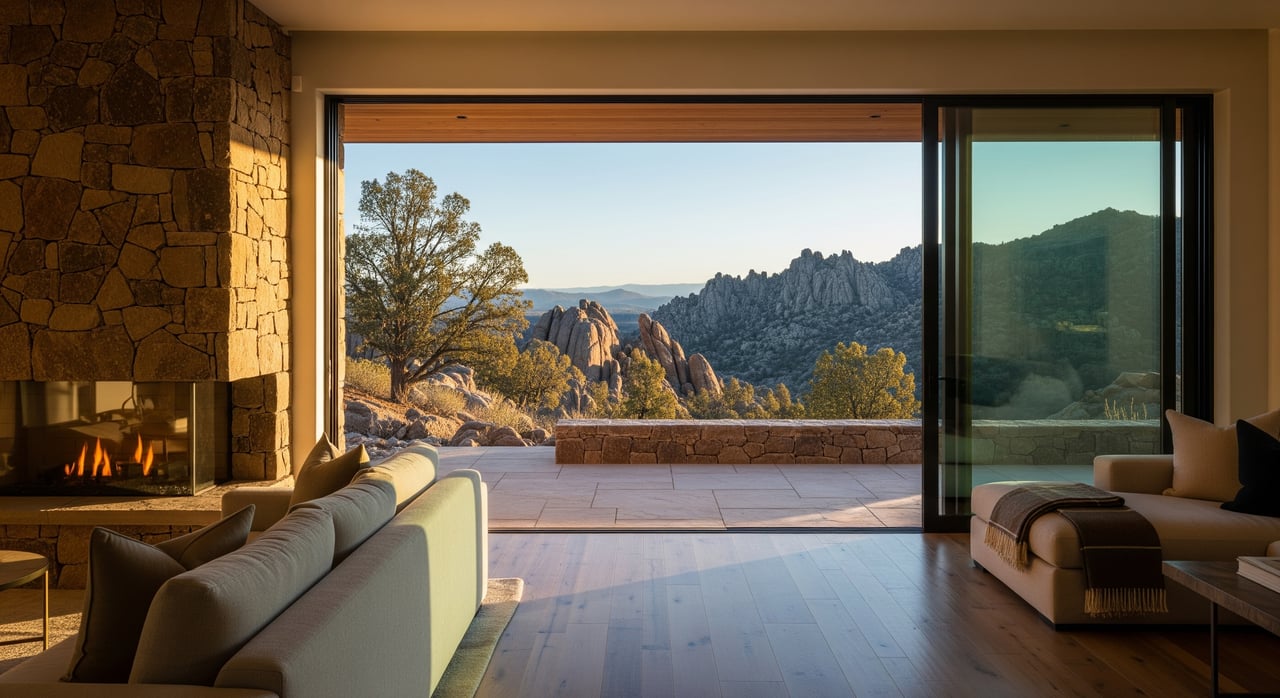
Your Enchanted Canyon home already has a showpiece: the sculpted granite rising just beyond your windows. The right staging and photography make those boulder views feel immediate, dramatic, and effortless for buyers. In this guide, you’ll learn how to open sightlines, arrange furniture, and plan twilight photos that capture Prescott’s crisp high-elevation light. You’ll also see a simple prep timeline and what to check with your HOA before photos. Let’s dive in.
Know Prescott light
Prescott sits at roughly 5,300 feet, which means cleaner air, more saturated color, and crisp shadow detail. Rock textures pop in warm, low-angle light, especially in fall and winter when the sun sits lower. Summer sun is higher and can cause harsher contrast, so plan to shoot early or late in the day.
Arizona stays on Mountain Standard Time year-round, so golden hour and blue hour fall at consistent clock times through the seasons. Check local sunrise and sunset for your shoot date, then plan to be ready 20 to 30 minutes before the best light.
Clear sightlines to the rocks
Your first job is to remove anything that interrupts the eye from interior rooms to the formations.
- Clear window sills, ledges, and railings. Small decor, plants, and candles break the horizon line.
- Relocate bikes, hoses, and yard gear out of frame. Keep patios clean and simple.
- Prune view-blocking branches 24 to 48 hours before photos so foliage settles and cuttings are gone.
- Deep clean glass inside and out. In Prescott’s dry climate, dust, water stains, and insect marks show clearly on camera.
Arrange furniture to frame views
The room should guide a buyer’s eyes toward the rocks without blocking glass or pathways.
Orient and scale
- Angle sofas and chairs toward the primary view. Leave a few inches of air between furniture and glass.
- Choose low-profile pieces near windows so backs do not cut the view. Benches and low-back sofas work well.
- Keep circulation clear. Aim for 30 to 36 inches of walkway from interior to exterior doors and between key pieces.
- Create a simple “viewing vignette.” Two chairs and a small table, or a single accent chair angled toward the formation, adds focus without clutter.
Color and materials
- Use a neutral base with layered textures that echo the outdoors: stone tones, warm woods, linen, and wool.
- Avoid bold, high-contrast patterns that compete with the view.
- Pull in outdoor hues through accents. A few pillows or an outdoor cushion in greens, ochres, or rust can connect inside to outside.
Elevate indoor-outdoor flow
Make the patio feel like a natural extension of the great room.
- Define outdoor “rooms.” Set a lounge or a small dining setup that faces the formation, not away from it.
- Keep it uncluttered. Remove small grills, stacked items, trash bins, and personal effects.
- Choose low furniture that frames the view. Adirondack chairs, benches, and low tables keep sightlines open.
- Add soft lighting on paths and steps. This reads beautifully in twilight photos and helps at showings.
Window treatments that show the view
Window coverings should help control glare without hiding the star of the show.
- Use sheers or minimal top treatments where privacy allows.
- Pull heavy drapes fully open for photos.
- If glare flashes on surfaces, use a light, neutral roller shade partially raised to soften hot spots while keeping most of the view visible.
- Motorized shades are a luxury touch and photograph cleanly. Demonstrating them during showings adds value.
Photography that flatters rock views
The goal is a natural, balanced image that shows texture outside and inviting light inside.
Choose the right time
- Golden hour, the first hour after sunrise and last hour before sunset, adds warm, directional light that brings out rock detail. It is great for exterior close-ups and interiors with sun entering the room.
- Blue hour, about 15 to 30 minutes after sunset or before sunrise, balances sky color with interior lights. Twilight images tend to stand out in listings and read as luxurious.
- Midday often creates harsh contrast. If you must shoot midday, use shaded angles, a polarizer, or bracket exposures for later blending.
Nail exposure and gear
- Use a tripod for interiors and twilight. It keeps images sharp at low ISO.
- A wide-angle lens around 16 to 35 mm full-frame equivalent captures indoor-outdoor relationships. Keep vertical lines straight to avoid distortion.
- Shoot RAW for maximum flexibility.
- Bracket exposures, usually 3 to 7 frames at 1 to 2 EV intervals, to hold detail in bright skies and darker interiors. Blend carefully so it looks natural.
- Keep ISO low, usually 100 to 400. For depth and sharpness, use around f/5.6 to f/11 depending on your lens.
Time your twilight
- Begin 20 to 30 minutes before sunset and continue 20 to 30 minutes after. At Prescott’s elevation, the color window can be short but intense.
- Turn on interior lamps and exterior accent lights 5 to 10 minutes before the blue-hour frames. Bulbs need time to warm for consistent color.
- Match interior bulb color where possible around 2700 to 3000K. This avoids mixed casts and saves time in post.
- Use a remote release or a short timer to prevent camera shake during long exposures.
Compose for scale
- Use doorways, beams, and window frames to set the scene and emphasize the rock formations.
- Add one foreground anchor, like a planter or a low table, to give depth and scale.
- Let deck boards, railings, and patio edges act as leading lines toward the view.
- Try both vertical and horizontal orientations. Vertical frames can emphasize tall tors and sky, while horizontals deliver panoramic context.
Aerials and compliance
Drone shots can reveal how your lot sits against the boulders and nearby trails. If you use aerials, confirm restrictions with your HOA and follow FAA rules for commercial operators. Avoid flying over neighbors, and respect any posted no-fly areas. Always prioritize privacy and safety.
Logistics, safety, and timing
Good prep smooths the photo day and protects your property.
- Check HOA and community rules early. Some communities restrict temporary signage, furniture placement, fire features, and drone use.
- Consider defensible space. Yavapai County and local fire agencies publish guidance about clearing flammables around structures. Avoid placing combustible staging items near native brush.
- Keep driveways and paths open for easy access during showings and the shoot.
Suggested prep timeline
- 7 to 10 days out: Confirm HOA and local guidance. Schedule a gardener or pruner if needed.
- 3 to 5 days out: Deep clean windows and patios. Stage outdoor seating. Remove garage and yard items that could show in photos.
- Day of shoot, morning: Final tidy. Arrange furniture and test shades. Check bulbs and exterior path lights.
- Twilight shoots: Allow the photographer access 60 to 90 minutes before sunset for setup and tests.
Pricing and value
High-quality twilight and aerial images often cost more than standard daytime photos. For luxury listings with standout views, these images can increase perceived value and engagement. Ask about your photographer’s experience with HDR, twilight, and high dynamic range blending in landscape-heavy scenes.
Seller pre-photo checklist
- Clean interior and exterior windows.
- Remove small objects from window sills and patios.
- Trim vegetation blocking primary views and remove debris.
- Move low-profile furniture to face the view and clear 30 to 36 inch walkways.
- Turn on interior lamps and match bulb color where possible.
- Stage one or two outdoor seating vignettes facing the formations.
- For twilight: confirm path and landscape lights work and coordinate timing.
Photographer kit checklist
- Tripod, wide-angle lens, remote shutter, level, spare batteries.
- RAW shooting capability and bracketing set to 3 to 7 frames at 1 to 2 EV.
- Polarizer for midday exteriors and a neutral density filter if needed.
- Drone pilot documentation if flying commercially.
Buyer questions to expect
- Privacy: If wide views raise privacy concerns, highlight natural buffers, topography, and lot spacing in your description and photos.
- Rock feature rules: Geological features on private property are generally not specially regulated, but HOA covenants and county zoning may apply to alterations.
- Seasonal light: Autumn and winter often deliver warmer, lower-angle light that shows more texture on rock. Consider a twilight set if your summer views feel harsh.
Bring it all together
When you open view corridors, simplify your palette, and plan for blue hour, your Enchanted Canyon home’s boulder backdrop does the heavy lifting. The result is a listing that feels calm, connected, and effortlessly luxurious, both online and in person. If you want a hands-on plan that pairs professional staging sensibility with premium photography, connect with Cheryl Fernandez to Request Your Personalized Home Valuation and a tailored prep timeline for your home.
FAQs
What is the best time to photograph boulder views in Prescott?
- Golden hour adds warm, directional light that highlights rock texture, while blue hour balances sky color with interior lighting for a luxurious, natural look.
How do I handle glare without hiding the view?
- Use sheers or a light roller shade partially raised to soften bright patches while keeping most of the view visible, and schedule photos when sun angles are softer.
Are drones allowed for listing photos in Enchanted Canyon?
- Drone use must follow FAA rules and any HOA or community restrictions; commercial operators typically need certification, and flights should respect neighbor privacy.
What landscaping is safe when staging near native brush?
- Follow defensible space guidance from local fire authorities, and avoid placing flammable decor or furniture close to vegetation or structures.
How wide should walkways be to show indoor-outdoor flow?
- Maintain 30 to 36 inches of clear space from interior paths to exterior doors and between primary furniture pieces so the transition reads open and inviting.